
overviewPreface
Today we continue to introduce you to TSMaster's new feature, the Automation Module. Usually in the development process, if a certain logic will be used repeatedly in different scenarios, the first thing we think of is to encapsulate it into a function for reuse.
I. Control gear signal generating pulse
Control gear signal to generate pulse
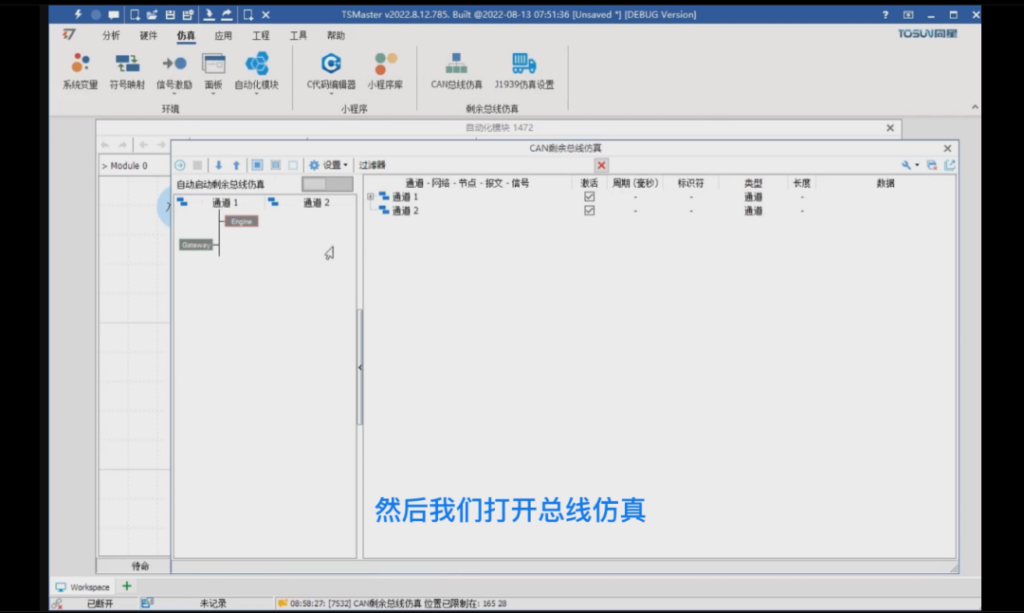
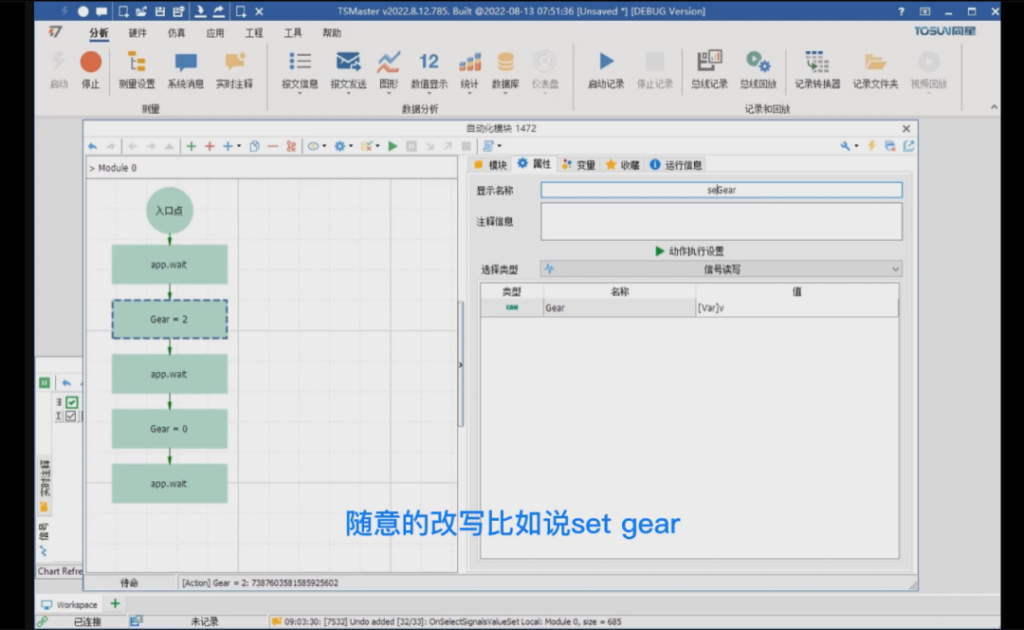
> First go to the project folder, find the database folder in the Demo folder, drag in the example database file, then open the bus simulation, check auto start and check all the nodes so that it can run up automatically. We then open the trace and graph window and drag the block signal we are interested in into the graph, we then come to the automation module and press enter to add the action.
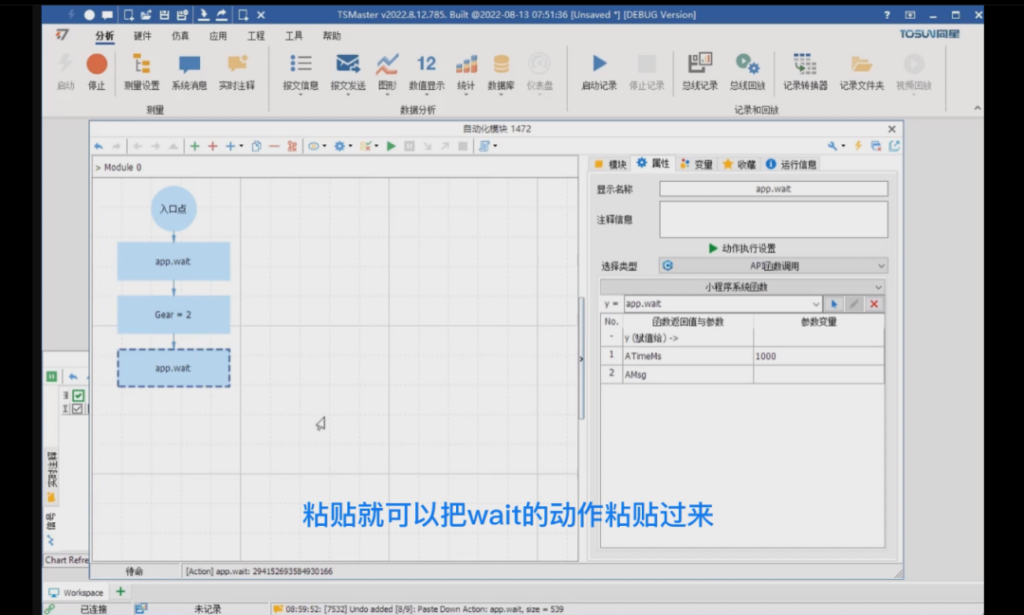
> The first action is set to wait for 1 second, here rewrite to 1,000 milliseconds, the message is not filled, so that it will not automatically pop up the READ window; the second action is set to change the block to two, at this time, just select the signal read/write attribute, click the right button to select our can signal for the block signal just now and click OK, and change this value to 2; the third action is to wait for three seconds, at this time we just copy the first action, press the key and paste to paste the wait action, then we will change 1,000 to 3,000, that is, wait for three seconds; the fourth action will change the blocking to 0, at this time, just copy the gear=2 to paste under the wait and change the 2 to 0; the last action to wait for one more second, we just need to wait the first wait to the last action and paste it. This realizes a process of waiting 3 seconds from block 0 to 2 to 0. Then we press F9 to run the program, from the graphics we can clearly see the process of changing gears, the process lasted 3 seconds.
II. Modify the width and height of the pulse
Modify the pulse width and height
Being a function is not as simple as just calling it, but also parameterizing what is run. For example, modifying the width and height of the pulse.
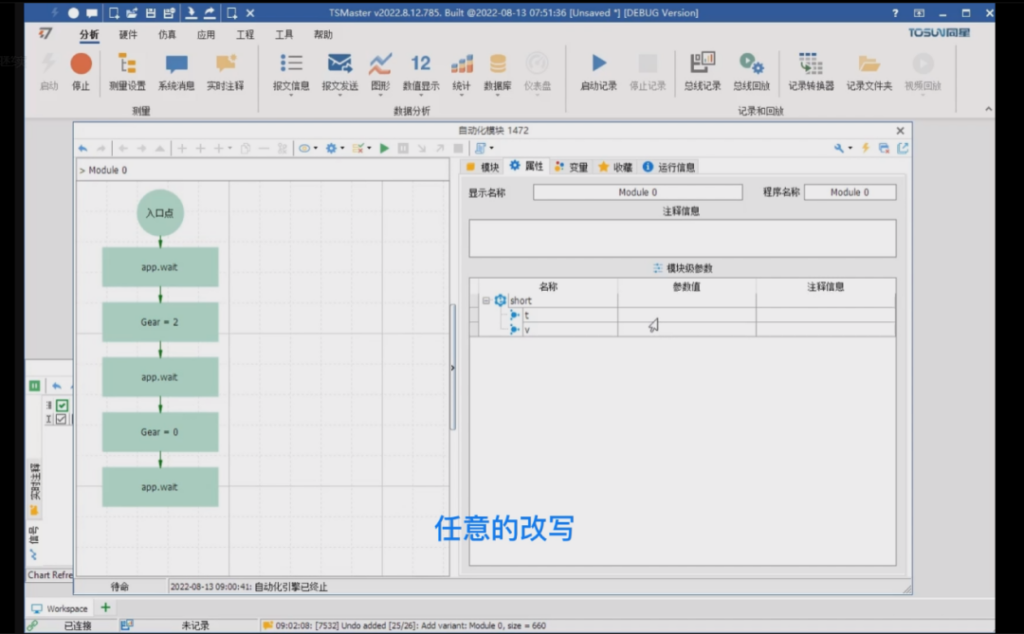
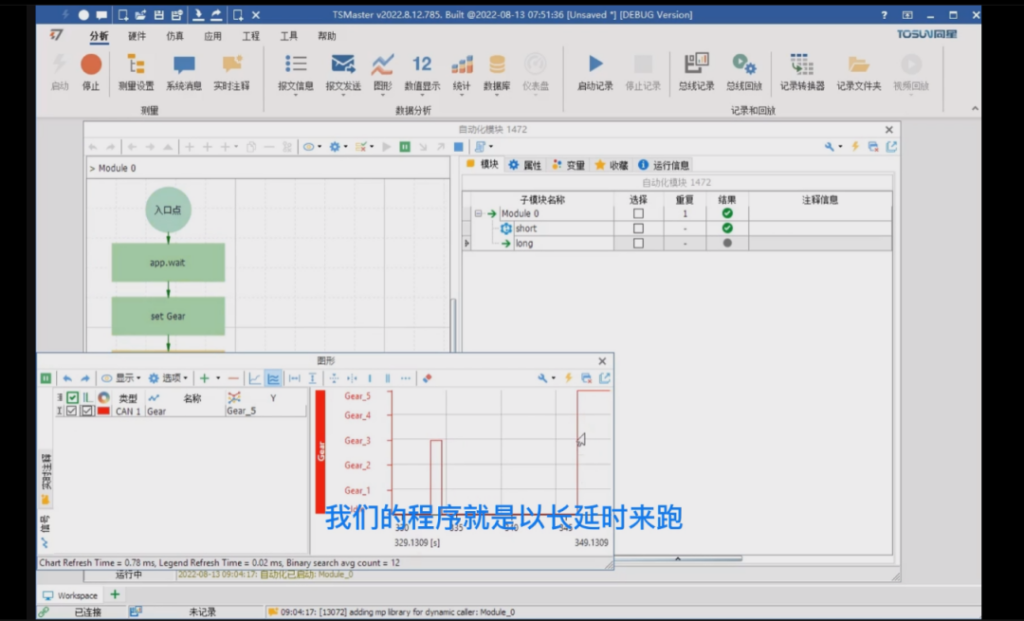
> This requires going back into our module and adding the variables height and width. Select the type of variable and then add two double type variables in the variable list, named time and value, we will abbreviate them as t and v, and change the default value of time to 3,000, as well as just 3 seconds value to 2. Afterwards, we click on the properties page, and then click on the blank space in the flowchart, so that the module's properties are selected.

> There is a column called Module Level Parameters in the bottom, right click on it and add a parameter group. We first rename the first parameter group as short, and right-click on this parameter group, select Add Parameter, will open a dialog box, which defaults to help us select the two variables we just added, we directly click OK, so that the increase of two sub-parameters, the value of these two parameters can be rewritten as a parameter of the module level arbitrarily.
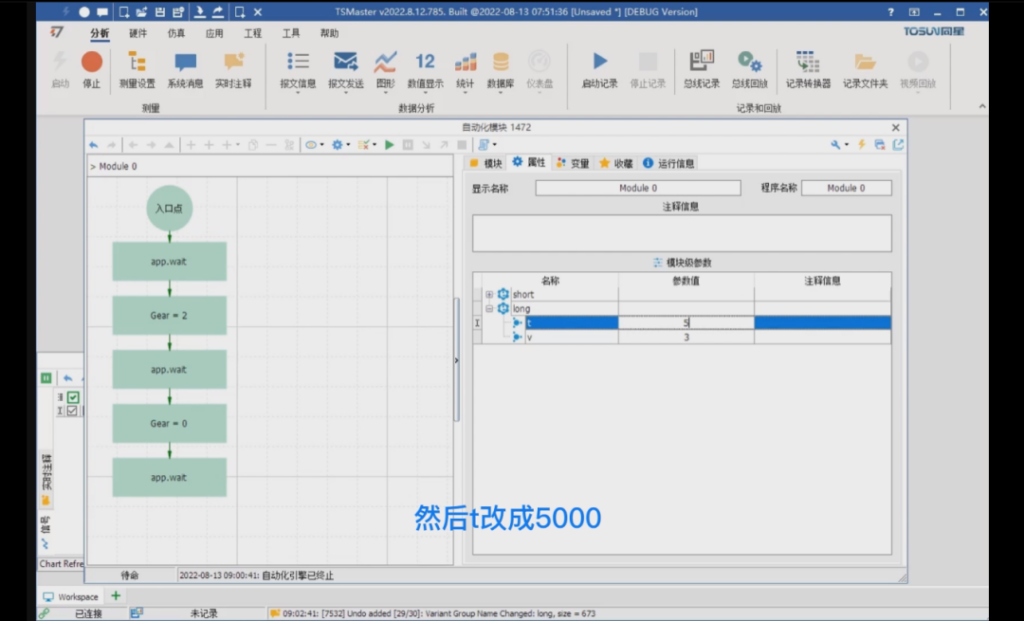
> For example, we can change the time for short to 1,000 milliseconds and change the value of v to 3. Then we can add a second parameter group, just right click on the first parameter group, copy the selection, and click paste in the blank space, and we get the pasted parameter group. We rename it to long, and then we change t to 5000, the wait time will be a little longer, and we change v to 5. So far we have created two groups of parameters, short delay and long delay.
> Subsequently, we switch to the module screen, you can see the bottom of the module appears two parameterized entries, respectively, short delay and long delay, then we need to associate our code and parameters, we go back to this gear = 2 this action, double-click after you can see that the judgment value is written to death 2, we click on the selection of the local variable, select our value, so that makes this gear, has become a dynamic value, then the name we can rewrite at will, such as set gear, and then wait for the time, we can also associate it to our local variables, that is, the t, then this will realize the two variables just set and our program binding.
> Then we next select our short delay, press F9, the program will run in short delay, you can see that his delay time is just one second, and his peak value is 3. Then go back to our module list and select the long delay, press F9 and you can see that our program is running in long delay, it's delay length is 5 seconds, and the peak value is 5. So that's how a module is parameterized. So this is how to parameterize a module. Then we can list as many parameters as we want, and the number of parameters is not limited, so that we can realize the same logic for the same test for different inputs for various controls.
III. Reuse methods for automation modules
Reuse methods of automation modules
> First make this module a library, rename the module to set gear, so the name becomes set gear, then we right click inside the module list, create a new sub-module and name it caller, that is, caller, to call our current gear setting module. This time we go to the module page, we can right click on set gear and move it to the code base, after selecting it we go to the bottom and there is a static code base, expand it and you can see that our set gear is already in the static code base. The good thing about a static codebase is that it can't be modified arbitrarily, which means that any codebase we add can be saved here permanently and can be called from any of the modules above.
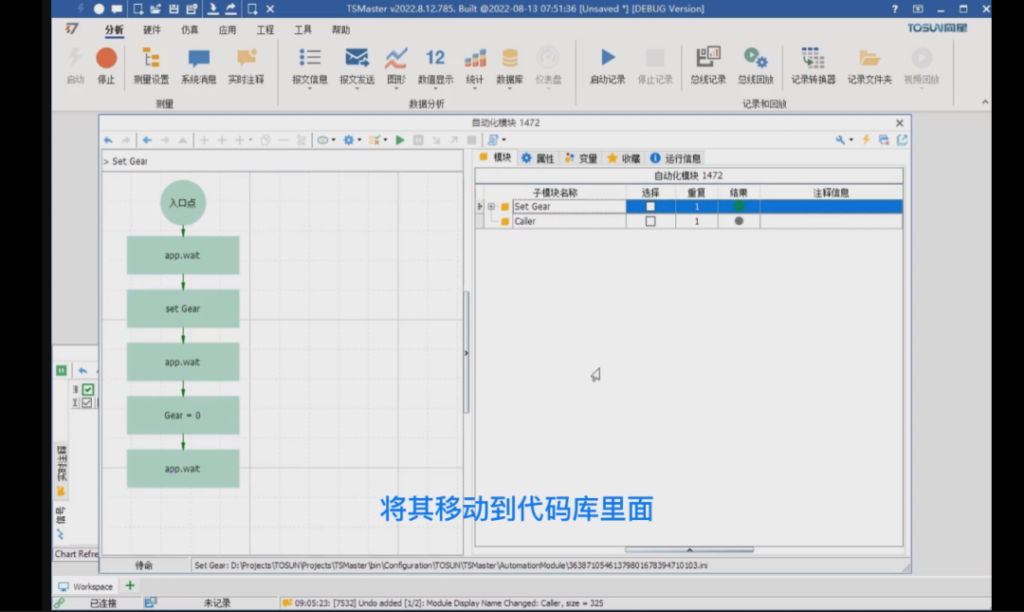
Then go back to the entry point of our caller function, press CTRL plus Enter, create a new action group, select the action group, then click on Properties, go to the right side to find the function of linking submodules, and then we can link to the code base of the set gear that we have just done, which realizes the association between our action group and the library file.
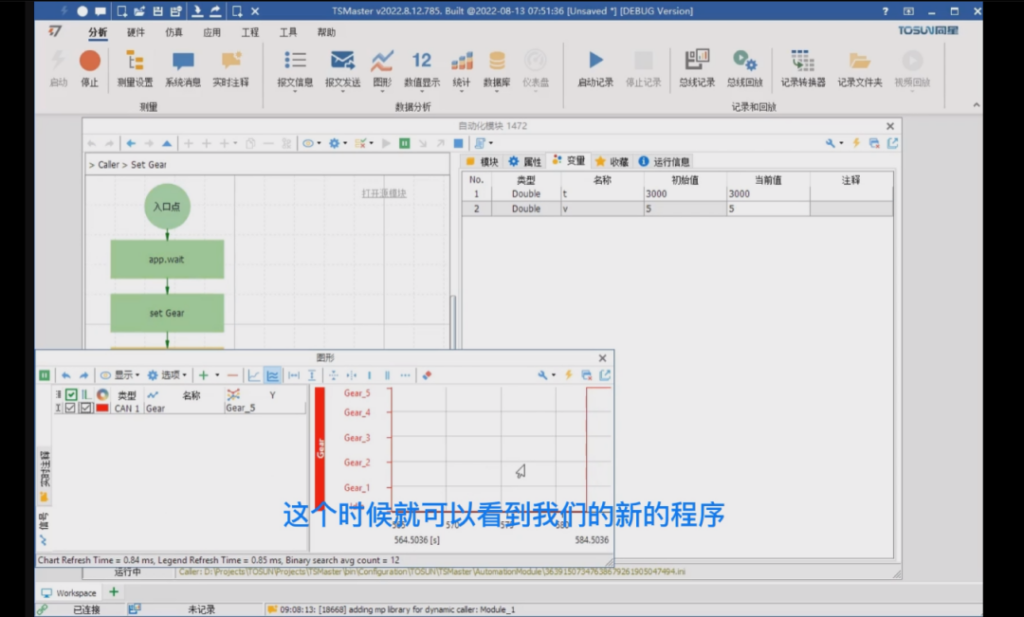
> As a library, the two variables inside its own module will not be created automatically, it is necessary to add variables with the same name inside the caller's module, we add two double type variables, rename it as t and v, then these two values can be changed arbitrarily, so that we can also realize the parameterization of the library, for example, we can shorten it to 500, then v is changed to 1, then we run the current caller, then we can see that after the gear runs, its value becomes 1, and the length of the delay becomes 500 milliseconds. For example, we can make it shorter by changing it to 500, and then we can change v to 1, and then we can run the current caller, and then we can see that after the gear is run, its value changes to 1, and the delay length changes to 500 milliseconds.

If we wish to call it multiple times, we can simply copy this action group ctrl c, ctrl v and then press F9 again, so that we can see the call repeated multiple times, and we can even modify the variable again each time to give it a different result each time it is run.
Then we can try to change it, let's say we'll change the selection, change it to 3,000, and then the value to 5, and then we'll F9, start it up, and this time we can see our new program running with different parameters. So that's one module and one complete parameterization.
About More
The above is the reuse method of automation module of TSMaster's new features, we will see you in the next issue! (You can watch our B-site video for specific operation explanation)


